本文共 5761 字,大约阅读时间需要 19 分钟。
一、Linux档案属性
在介绍概念前,我们需要了解Linux的ls指令。首先我们利用su -切换身份成为root,我们切换root的原因是后面会用到chgrp、chown等指令,这些指令都需要root的身份才能够处理。但注意,在使用root权限时,不建议直接使用root直接登入系统,而是建议使用su -这个指令来切换身份。想要离开root权限直接使用exit命令即可。
切换为root后,我们使用ls -al指令,显示结果如下:
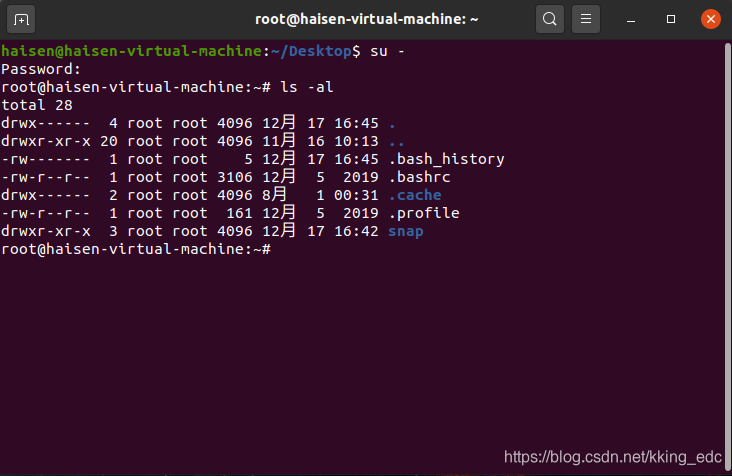
ls命令是list的意思,其作用是显示档案的名字及相关属性。而选项-al则表示列出所有的档案详细的权限与属性(包含隐藏档案,就是档案名第一个字符为“.”的档案)。我们以上面的一行: -rw-r--r-- 1 root root 161 12月 5 2019 .profile
为例,来介绍下我们获取到的是什么样的信息。上面的信息总共可被分为七个部分,以下就介绍下这七部分都代表什么。
1.1 第一部分-档案类型及权限
这个部分总共有十个字符,在我们的例子中,就是:
-rw-r--r--
第一个字符代表这个档案是目录、档案还是连接档:
- 当为
d时为目录 - 当为
-时为档案 - 当为
l时为连接档(link file) - 当为
b时为装置档里面的可供存储的周边设备(随机存储设备) - 当为
c时为装置档里面的序列埠设备,例如键盘和鼠标(一次性读取设备)
在本例中为-,代表为档案
接下来的字符中,以三个为一组,且均为[rwx]这三个参数的组合:
r代表可读w代表可写x代表可执行
需要注意,这三个权限的位置不会改变,如果没有对应的权限,那么会出现减号-
这三组分别代表的权限是:
- 第一组代表档案拥有者的权限,在我们的例子中,这三个字符是
rw-,代表该档案的拥有者可以读写,但是不可以执行 - 第二组为加入此群组的账号的权限
- 第三组为非本人且没有加入本群组的其他账号的权限
需要注意的一点是,目录和档案的权限意义并不相同,这是因为目录和档案所记录的资料内容不同。这些将在2.3节中进行介绍。
1.2 第二到第七部分
- 第二部分表示有多少档名连接到这个结点(i-node)。每个档案都会将它的权限属性记录到档案系统的i-node中,不过,我们使用的目录树却使用档名来记录,因此每个档名就会连接到一个i-node上。这个属性记录的,就是有多少不同的档名连接到相同的i-node号码上去。关于i-node的相关资料会在第七章讲到档案系统再进行介绍,在我们的例子中是
1 - 第三部分表示这个档案(或目录)的拥有者账号,在我们的例子中是
root - 第四部分表示这个档案的所属群组。在Linux系统下,我们的账号会加入一个或多个群组中。假设class1、class2、class3均属于projecta这个群组,并假设某个档案所属的群组为projecta,且该档案的权限为
-rwxrwx---,则class1、class2、class3三人对于该档案都具有可读、可写、可执行的权限。但如果是不属于projecta的其他账号,则对于这个档案就没有任何权限了(因为是---),在我们的例子中是root。 - 第五部分是这个档案的容量大小,预设单位为bytes,在我们的例子中是
161 - 第六部分是这个档案的建档日期或是最近的修改日期。这一栏的内容为日期及时间,如果这个档案被修改的时间距现在太久了,那么这部分仅会显示年份,在我们的例子中为
12月 5 2019 - 最后一部分是这个档案的档名。比较特殊的是,如果档名之前有一个
.,则代表这个档案为隐藏档,我们的例子.profile就是一个隐藏档。当我们使用ls时,所有的隐藏档都不会显示:
二、如何更改档案属性及权限
在这里我们介绍以下三个指令:
- chgrp:更改档案所属群组
- chown:改变档案拥有者
- chmod:改变档案的权限,SUID、SGID、SBIT等等的特性
2.1 chgrp
改变一个档案的群组很简单,直接使用chgrp就可以(这个指令本身就是change group的缩写)。但要注意一点,要被改变的群组名必须要在/etc/group档案内才可以,否则会报错。
这个命令的格式如下:
chgrp [-R] dirname/filename//选项与参数//-R:进行递归的持续变更,即将同目录下的所有档案、目录都更新为属于这个群组。常常用来变更某一目录内的所有档案的情况。
假设我们已经是root身份了,现在在根目录下有一个名为test.cfg的档案:
 那么我们如何更改该档案的群组呢?假设我们已经知道了在/etc/group里面已经存在了一个名为users的群组,此时我们执行
chgrp users,再执行ls -l,结果如下:  可以发现,此时档案的群组已经被修改为了users。
 2.2 chown
这个命令用来改变一个档案的拥有者,需要注意的是,使用者必须是已经存在系统中的账号,也就是在/etc/passwd这个档案中有记录的使用者名称。
chown命令不仅可以更改档案的拥有者,还可以顺便直接修改群组的名称,其格式如下:
chown [-R] 账号名称 档案或目录chown [-R] 账号名称:群组名称 档案或目录选项及参数:-R:进行递归的持续变更,即连同此目录下的所有档案都变更
下面是一个使用范例,在执行命令前,档案状态如下:
 我们执行
我们执行chown test test.cfg,将test.cfg的拥有者修改为test,再次执行ls -l,结果如下:  chown还可以这样使用:
chown user.group file,即在拥有者和群组之间利用小数点隔开。但是因为我们可能在设置账号时加入小数点,例如test.example这样的账号格式,着就会造成系统的误判。所以建议使用冒号来隔开拥有者和群组。此外,chown也可以单纯的修改所属的群组。例如,chown .user test.cfg,这就是修改群组。 2.3 chmod
权限的设定方法有两种,我们可以使用数字或符号来进行权限的变更:
2.3.1 数字类型修改档案权限
Linux档案的基本权限有九个,分别是owner/group/others三种身份各自的read/write/execute权限,在上面的介绍中,对于权限的表示字符是这样的形式:-rwxrwxrwx,对于每组权限,我们可以数字来代表权限,各个权限的数字对照表如下所示:
- r-4
- w-2
- x-1
每种身份(owner/group/others)各自的三个权限(r/w/x分数是需要累加的),例如当权限为-rwxrwx---时分数是:
- owner=rwx=4+2+1=7
- group=rwx=4+2+1=7
- others=—=0+0+0=0
所以这个档案的权限用数字表示就是770,利用数字变更权限的语法如下:
chmod [-R] xyz 档案或目录选项及参数:-R:进行递归的持续变更,即连同此目录下的所有档案都会变更xyz:就是刚刚介绍的数字类型的权限属性,为rwx属性数值的相加
举例来讲,如果要将test.cfg这个档案的所有权限都设定启用:
 如果要将权限变为
-rwxr-xr--,那么我们就将777修改为754,其他的权限修改也同理。 2.3.2 符号类型修改档案权限
在这种表示方式下,我们用u、g、o表示user、group、others三种身份,用a表示all即全部的身份。
假设我们要设定一个档案的权限为-rwxr-xr-x时,我们可以这样执行命令:
 除了直接指定权限外,我们还可以使用
+和-增减权限,例如,假如我们不知道原来的档案属性,现在我们只想要增加test.cfg这个档案的可写入的权限,让所有人都可以写入这个文件,那么我们可以这样: chmod a+w test.cfg
如果我们想要去除全部人的可执行权限:
chmod a-x test.cfg
+、-和=是不同的,在+、-的状态下,只要是没指定到的项目,则权限不会变动,在某些情况下这是很方便的。
三、目录和档案的权限意义
3.1 权限对档案的重要性
档案是实际含有资料的地方,包括一般的文字档、资料库内容档、二进制可执行档。因此,权限对于档案来说,意义如下:
- r:可读取此档案的实际内容,如读取文字档的文字内容等
- w:可以写入、新增或是修改该档案的内容(但不含删除该档案)
- x:该档案具有可以被系统执行的权限
对于可执行权限x我们需要小心。在Windows下一个档案是否具有执行的能力是借助副档名来判断的,例如:.exe、.bat、.com等等,但是在Linux底下,我们的档案能否被执行,则是藉由是否具有x这个权限来决定的,和档名没有绝对的关系。
3.2 权限对目录的重要性
目录主要的内容是记录档名清单,在针对目录时,r、w、x的意义如下:
- r(read contents in directory):表示具有读取目录结构清单的权限,所以当我们具有读取一个目录的权限时,表示我们可以查询该目录下的档名资料。这时我们就可以利用ls这个指令将该目录的内容列显示出来。
- w(modify contents of directory):这个可写入的权限对目录来讲,代表着我们具有改动该目录结构清单的权限,也就是如下权限: a. 建立新的档案与目录 b. 删除已经存在的档案与目录(不论该档案的权限为什么) c. 将已存在的档案与目录进行更名 d. 搬移该目录内的档案、目录位置
- x(access directory):目录不可被执行,目录的x代表的是使用者能否将该目录当作工作目录来使用。工作目录(work directory)就是指我们目前所在的目录,当我们登人Linux时,我们的家目录就是我们当前的工作目录,变更工作目录的指令是
cd
如果我们不具有某目录的x权限,那么我们就无法切换到该目录下,也就无法执行该目录下的任何指令,即使我们具有该目录的r或w权限。
所以当我们在假设网站时,如果我们想要开放目录资料给网络上的任何人来浏览,那么我们不能仅开放r权限,这样会导致网站服务器软件无法到该目录下读取档案(最多只能看到档名),最终用户总是无法查询到档案的内容(显示权限不足)。所以如果我们要开放目录给任何人浏览时,应该至少给与r及x的权限,但是w权限不能随便给。
四、档案种类与副档名
4.1 档案种类
在我们刚刚使用ls -l观察到的第一栏的十个字符中,第一个字符为档案的类型。除了常见的一般档案-与目录档案d外,我们再介绍下其他种类的档案类型。
- 常规文件(regular file):这就是一般我们进行存取的档案,在由
ls -al所显示出来的属性方面,第一个字符为-,例如-rwxrwxrwx。另外,根据档案的内容,又可大致分为: a. 纯文字文件(ASCⅡ):这是Linux系统中最多的一种文件类型,称为纯文字文件是因为其内容是我们可以直接读到的资料,如数字和字母等。我们可以下达cat 文件来查看文件的内容(cat是将一个文件内容读出来的指令) b. 二进制文件(binary):我们的系统仅能执行二进制文件,所以我们的Linux中的可执行文件就是这种格式的 c. 数据文件(data):有些程序在运行的过程中会读取某些特定格式的文件,这些特定格式的文件可以被称为数据文件。例如,我们的Linux在使用者登入时,会将登陆的资料记录在 /var/log/wtmp这个文件内,该文件就是一个数据文件,可以通过last这个指令读出来。但是使用cat会出现乱码,因为这是一种特殊格式的文件。 - 目录(directory):第一个属性为
d,例如drwxrwxrwx - 连接文件(link):第一个属性为
l,例如lrwxrwxrwx - 设备文件(device):这是与系统周边及存储等相关的一些文件,通常集中在/dev这个目录下。这个文件通常又分为两种: a. 区块(block)设备文件:存储一些存储资料,例如我们的硬盘中的文件,这些文件的第一个属性为
bb. 字符(character)设备文件:这是一些序列埠的周边设备,例如鼠标和键盘。这些设备的特色是一次性读取的,不能够截断输出。举例来说,我们不可能让鼠标“跳到”另一个画面,而是连续性滑动,这些文件的第一个属性为c - 资料接口文件(sockets):这种类型的文件通常被用在网络上的资料承接。我们可以启动一个程序来监听用户端的要求,这样用户端就可以透过这个socket来进行资料的沟通了。第一个字符为
s,我们可以经常在/run或/tmp这些目录中看到这种档案类型 - 资料传送文件(FIFO,pipe):FIFO也是一种特殊的文件类型,这个文件的存在目的在于解决多个程序同时存取一个文件所造成的错误。FIFO是first-in-first-out的缩写,第一个字符为
p
4.2 Linux文件副文件名
基本上,Linux文件是没有所谓的副文件名的,一个Linux文件能不能被执行,与这个文件的第十个属性有关,与文件名一点关系都没有。这个观念和Windows有些不同,在Windows下,能被执行的文件的副文件名通常是.com、.exe、.bat等等,而在Linux下,只要我们的权限中具有x,就代表了这个档案具有可被执行的能力。
但是注意,可以被执行与可以执行成功是不一样的,如果我们将一个文字文件修改权限为可执行,这个文件也无法执行成功。
我们用Linux的副文件名来了解该文件是什么,通常有几种常用的副文件名:
- *.sh:脚本(scripts)文件,因为是使用shell写成的,所以副文件名就写成.sh
- *.Z, *.tar, *.tar.gz, *.zip, *.tgz:经过打包的压缩文件。因为有很多压缩软件如gunzip, tar等,不同的压缩软件通常取相关的副文件名
- *.html, *.php:网页相关文件,分别代表HTML和PHP语法的网页档案。html的档案可以使用网页浏览器来直接开启,至于php的文件,则可以通过client端的浏览器来进行server端浏览,以得到运算后的网页结果。
转载地址:http://mntx.baihongyu.com/